Bạn đã từng viết xong một bài blog thật kỹ lưỡng, nhưng khi kiểm tra lại mới phát hiện thiếu thẻ meta? Hay đôi khi bạn quên thêm từ khóa chính vào URL, hoặc không chèn liên kết nội bộ? Những lỗi nhỏ tưởng chừng đơn giản ấy lại là nguyên nhân khiến bài viết của bạn mãi không thể bứt phá trên Google.
Đó là lý do vì sao mọi SEOer (từ người mới đến chuyên gia) đều cần một checklist SEO Onpage rõ ràng. Checklist sẽ giúp bạn không bỏ sót bước nào khi tối ưu nội dung, đảm bảo bài viết chuẩn cấu trúc, đúng kỹ thuật, thân thiện với người dùng và Google.
Trong bài viết này, VietMoz sẽ chia sẻ cho bạn checklist SEO Onpage gồm 22 hạng mục quan trọng, bao gồm:
- Tối ưu nội dung theo từ khóa và intent,
- Các yếu tố kỹ thuật cần kiểm tra (slug, heading, ảnh, tốc độ…),
- Cách chuẩn hóa quy trình viết bài SEO.
Bạn cũng sẽ nhận được file checklist SEO Onpage miễn phí để áp dụng ngay cho bài viết tiếp theo của mình.
TẢI MIỄN PHÍ: File Checklist SEO Onpage bản chuẩn 2026. Đầy đủ 22 bước tối ưu giúp bài viết lên top Google.
Để bài viết có thể lên top bền vững, bạn cần kết hợp cả hai yếu tố: nội dung chất lượng phục vụ người đọc và kỹ thuật Onpage chuẩn để Google dễ hiểu, dễ lập chỉ mục.
Trong phần đầu tiên của checklist, chúng ta sẽ tập trung vào những yếu tố liên quan đến việc xây dựng nội dung: từ nghiên cứu từ khóa, phân tích intent, đến cách trình bày logic và tối ưu trải nghiệm đọc.
Đây cũng là nhóm thao tác bạn thực hiện nhiều nhất và thường dễ bỏ sót nếu thiếu một hệ thống rõ ràng.
Checklist tối ưu nội dung (Content SEO)
Nhóm 1: Nghiên cứu từ khóa và ý định tìm kiếm
Nghiên cứu từ khóa chính và từ khóa phụ
Trước khi viết bài, hãy xác định từ khóa chính (từ khóa mục tiêu) và một số từ khóa phụ liên quan (LSI, đồng nghĩa, truy vấn liên quan). Đây là nền tảng để định hướng nội dung và cấu trúc bài viết.
Hiểu đúng search intent của từ khóa
Mỗi từ khóa thể hiện một mục đích tìm kiếm khác nhau: tìm hiểu, so sánh, mua hàng… Đảm bảo nội dung bạn viết đáp ứng đúng mục đích tìm kiếm của người dùng thì mới có khả năng lên top. Nếu bạn vẫn đang phân vân cách xác định intent chính xác cho từ khóa? Bạn có thể tìm hiểu thêm về search intent là gì? nhé!

Nhóm 2: Tối ưu bố cục và phân bổ từ khóa
Đặt từ khóa chính trong 100 từ đầu tiên
Google đánh giá cao những nội dung nêu rõ chủ đề ngay từ đầu. Từ khóa chính nên xuất hiện một cách tự nhiên ở đoạn mở đầu, giúp cả người đọc và công cụ tìm kiếm hiểu bài viết đang nói về điều gì.
Sử dụng từ khóa chính trong thẻ H1, ít nhất 1 thẻ H2
Đảm bảo từ khóa chính có mặt trong tiêu đề chính (H1) và xuất hiện ở ít nhất một tiêu đề phụ (H2). Điều này giúp Google định hình rõ chủ đề và cấu trúc nội dung.
Đảm bảo độ dài nội dung phù hợp
Bài viết nên có độ dài từ 800–1500 từ trở lên, tùy lĩnh vực. Nội dung quá ngắn thường không đủ chiều sâu để Google đánh giá cao, trừ những bài cực kỳ tập trung như định nghĩa ngắn.
Mật độ từ khóa hợp lý, không nhồi nhét từ khóa
Từ khóa chính nên xuất hiện một cách tự nhiên, mật độ khuyến nghị: 0.8–2%. Tránh lặp đi lặp lại quá mức gây phản cảm cho người đọc và bị Google coi là spam.
Sử dụng từ khóa liên quan, semantic, đồng nghĩa
Thêm các cụm từ gần nghĩa/từ khóa phụ để tăng độ phủ semantic. Điều này giúp Google hiểu bài viết có chiều sâu, chứ không chỉ tập trung vào 1 từ khóa.
Nhóm 3: Tối ưu liên kết
Chèn liên kết nội bộ hợp lý
Internal link tới các bài viết liên quan khác trên website. Giúp giữ chân người đọc, tăng thời gian on site và hỗ trợ Google crawl trang hiệu quả hơn.
Thêm liên kết ngoài external link uy tín
Trích dẫn nguồn dữ liệu từ website uy tín (Wikipedia, báo lớn, tài liệu chính thức…) giúp tăng độ tin cậy cho nội dung của bạn.
Chèn CTA (kêu gọi hành động) rõ ràng
Một bài viết SEO tốt cần có CTA thúc đẩy người đọc hành động: đăng ký, liên hệ, tải tài liệu, đọc thêm bài khác… tùy vào mục tiêu bài viết.
Checklist tối ưu kỹ thuật Onpage
Nhóm 1: Hiển thị trên SERP
Slug ngắn, rõ ràng, có từ khóa
Slug nên thể hiện chủ đề bài viết, viết bằng chữ thường, không dấu, không quá dài.
Ví dụ tốt: slug-la-gi.
Ví dụ xấu: bai-viet-huong-dan-toi-uu-slug-chi-tiet-nhat.
Cấu trúc URL thân thiện
URL nên đơn giản, không chứa ký tự lạ, không có số bài viết. Cấu trúc như: tenmien.com/tu-khoa-chinh là tối ưu nhất.

Nhóm 2: Cấu trúc tiêu đề và phân tầng nội dung
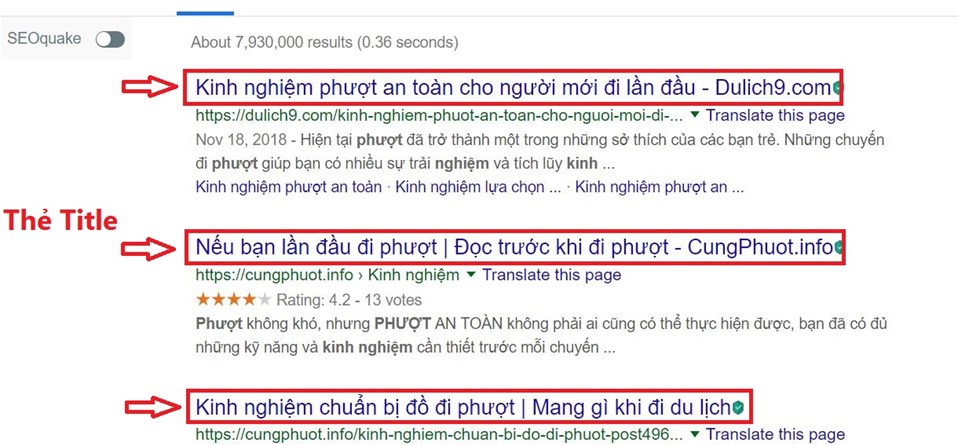
Title tag chứa từ khóa chính, không dài quá 70 ký tự
Tiêu đề hiển thị trên Google nên bắt đầu hoặc gần đầu với từ khóa chính, hấp dẫn và không bị cắt giữa chừng trên SERP.
Title tag chứa từ khóa chính, không dài quá 70 ký tự
Phần mô tả nên dài 140–160 ký tự, có từ khóa và tạo được cảm giác tò mò, thúc đẩy người dùng nhấp chuột.
Chỉ có một thẻ H1 duy nhất
H1 là tiêu đề chính, duy nhất và phản ánh chủ đề toàn bài. Các tiêu đề còn lại sử dụng H2, H3 để phân tầng nội dung.
Thẻ H2, H3 được phân cấp logic, có từ khóa phụ
Sử dụng H2 cho mục chính, H3 cho mục con. Mỗi thẻ nên có chứa từ khóa phụ hoặc cụm từ liên quan để tăng liên kết ngữ nghĩa.
Nhóm 3: Tối ưu hình ảnh và bố cục bài viết

Tối ưu hình ảnh: tên file ảnh và thẻ alt text
Tên ảnh nên là tiếng Việt không dấu, liên quan đến nội dung ảnh. Thẻ alt mô tả ảnh bằng ngôn ngữ tự nhiên, có thể chèn từ khóa nếu phù hợp.
Có mục lục tự động (Table of Contents)
Giúp người đọc dễ dàng điều hướng nội dung dài và giúp Google tạo sitelink hoặc snippet có lợi trên SERP.
Định dạng văn bản dễ đọc
Sử dụng đoạn văn ngắn, chia ý bằng bullet, in đậm từ khóa hoặc thông tin quan trọng để tăng trải nghiệm người đọc.
Nhóm 4: Tối ưu tốc độ và trải nghiệm người dùng

Sử dụng Google Pagespeed Insights để đo hiệu suất. Hình ảnh cần được nén, JS/CSS nên được tối ưu. Tốc độ chậm ảnh hưởng lớn đến SEO.
Sau khi hoàn thiện các yếu tố cơ bản, bạn có thể tiếp tục áp dụng thêm các kỹ thuật nâng cao để gia tăng cơ hội xuất hiện nổi bật trên SERP và cải thiện trải nghiệm người dùng. Cùng đọc tiếp các mẹo tối ưu Onpage dưới đây nhé!
Checklist SEO Onpage nâng cao
Thêm Schema Markup kích hoạt rich snippet
Bước 1: Xác định loại Schema phù hợp:
-
- Chọn Schema dựa trên nội dung trang:
- Article: Dành cho blog, bài tin tức.
- FAQPage: Dành cho trang câu hỏi thường gặp.
- HowTo: Dành cho hướng dẫn từng bước (nấu ăn, DIY).
- Product: Dành cho trang sản phẩm (hiển thị giá, đánh giá).
- Tham khảo danh sách Schema tại schema.org.
- Chọn Schema dựa trên nội dung trang:
Bước 2: Thêm mã JSON-LD vào HTML: Đặt mã trong thẻ <head> hoặc <body> của trang.
Ví dụ cho FAQPage:
| <script type=“application/ld+json”> { “@context”: “https://schema.org”, “@type”: “FAQPage”, “mainEntity”: [ { “@type”: “Question”, “name”: “SEO Onpage là gì?”, “acceptedAnswer”: { “@type”: “Answer”, “text”: “SEO Onpage là quá trình tối ưu các yếu tố trên trang như nội dung, tiêu đề, hình ảnh, liên kết để cải thiện thứ hạng trên Google.” } } ] } </script> |
Bước 3: Sử dụng plugin (nếu dùng WordPress):
Bước 4:Kiểm tra Schema Markup:
-
-
- Dùng Google’s Structured Data Testing Tool.
- Đảm bảo không có lỗi (ví dụ: thiếu thuộc tính hoặc sai định dạng).
-
Bước 5:Cập nhật Schema thường xuyên:
-
- Kiểm tra và cập nhật Schema khi nội dung trang thay đổi.
Tối ưu Core Web Vitals
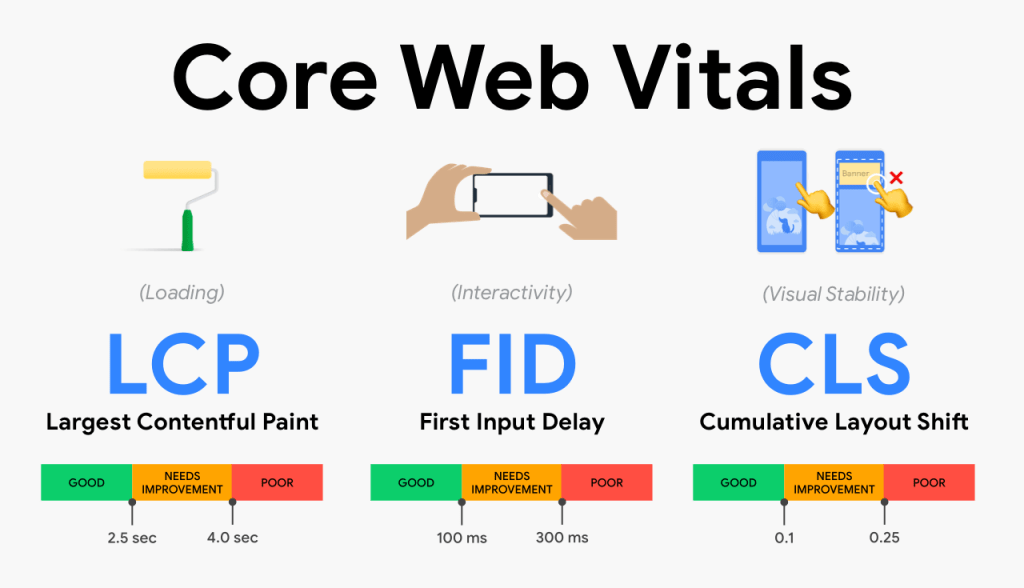
- Tối ưu LCP (< 2.5 giây):
-
-
- Nén hình ảnh: Chuyển sang định dạng WebP, giữ kích thước <100KB.
- Sử dụng CDN để tăng tốc phân phối nội dung.
- Tối ưu server: Chọn hosting nhanh, bật cache trình duyệt.
- Thêm preload cho tài nguyên quan trọng:
<link rel=”preload” href=”style.css” as=”style”>
-
- Tối ưu INP (< 200ms):
-
-
- Giảm JavaScript không cần thiết, chia nhỏ các tác vụ nặng.
- Sử dụng thuộc tính defer hoặc async cho script:
<script defer src=”script.js”></script> - Tối ưu hóa sự kiện tương tác (click, gõ) để giảm độ trễ.
-
- Tối ưu CLS (< 0.1):
-
- Đặt kích thước cố định cho hình ảnh/video:
<img src=”example.jpg” width=”300″ height=”200″ alt=”Example”> - Dành không gian cho quảng cáo để tránh dịch chuyển bố cục.
- Đặt kích thước cố định cho hình ảnh/video:
Tải font nhanh với font-display: swap:
| @font-face { font-family: ‘Example’; src: url(‘example.woff2’); font-display: swap; } |
Thiết kế Responsive để tối ưu mobile-first
- Khai báo meta viewport:
- Thêm vào <head> của HTML:
- Áp dụng thiết kế mobile-first với CSS Media Query:
| <meta name=“viewport” content=“width=device-width, initial-scale=1”> |
- Áp dụng thiết kế mobile-first với CSS Media Query:
Bắt đầu với CSS cho mobile, sau đó mở rộng cho màn hình lớn:
| /* CSS cho mobile */ body { font-size: 16px; line-height: 1.5; } button { padding: 10px 20px; min-width: 100px; } /* Điều chỉnh cho màn hình lớn */ @media (min-width: 768px) { body { font-size: 18px; } } |
- Đảm bảo trải nghiệm mobile tốt:
- Font chữ >16px, khoảng cách dòng 1.5 để dễ đọc.
- Nút bấm lớn (min-width: 44px), cách nhau ≥8px để dễ chạm.
- Tối ưu hình ảnh: Sử dụng định dạng WebP, thêm loading=”lazy”:
<img src=”example.webp” loading=”lazy” alt=”Example”>
- Kiểm tra tính responsive:
-
-
- Dùng Google’s Mobile-Friendly Test.
- Xem trước giao diện trên trình duyệt (Ctrl+Shift+M).
- Kiểm tra thực tế trên thiết bị di động cá nhân.
-
- Theo dõi và cải thiện:
-
- Kiểm tra tốc độ tải trên mobile bằng PageSpeed Insights.
- Đảm bảo thời gian tải <3 giây trên kết nối di động.
SEO Onpage là một quá trình cải thiện dần đều, không phải một lần là xong. Cứ sau mỗi bài viết bạn lại làm tốt hơn một chút, checklist này sẽ trở thành phản xạ tự nhiên trong tư duy viết nội dung của bạn.
Nếu bạn làm việc trong team content, bạn cũng có thể chia sẻ checklist này cho đồng đội để cùng tạo ra hệ thống nội dung chuẩn hóa. Đây là nền tảng vững chắc cho bất kỳ chiến lược SEO nào.
SEO Onpage không phải là một bước riêng biệt mà là nền móng gắn liền với từng câu chữ. Từ tiêu đề đến hình ảnh, mọi chi tiết đều góp phần quyết định thứ hạng của bạn trên Google.
Checklist là điểm tựa, không phải là đích đến. Quan trọng hơn cả là bạn biết mình đang tối ưu điều gì, cho ai, và vì sao. Một người viết SEO giỏi không chỉ biết làm đúng, mà biết cách biến từng bài viết thành một trải nghiệm đủ hấp dẫn với người đọc, đủ rõ ràng với Google.
Nếu bạn muốn được cầm tay chỉ việc khi áp dụng checklist này, hãy bắt đầu từ một lộ trình học SEO bài bản.
Tại VietMoz, bạn sẽ được hướng dẫn từng bước: từ nghiên cứu từ khóa, tối ưu nội dung, đến kỹ thuật Onpage nâng cao (Heading, URL, Schema, Internal link…). Hãy tham khảo Khóa học đào tạo SEO tại VietMoz ngay hôm nay để được:
Học từ thực tế – Làm qua dự án – Có người đồng hành.
Dù bạn là người mới bắt đầu hay đang muốn nâng cấp kỹ năng SEO, hãy để VietMoz giúp bạn xây nền vững chắc cho sự nghiệp.
